Nginx基础
一、nginx概念
Nginx是一个高性能的HTTP和反向代理web服务器,特点占用内存少,并发能力强。
反向代理和正向代理
- 正向代理是 客户端主动配置的代理服务器,代理客户端向外部服务器发起请求。客户端明确知道自己通过代理访问目标资源。正向代理典型场景:突破网络限制(访问被封锁的网站);隐藏客户端真实 IP(匿名上网);企业内网统一管控外网访问
- 反向代理是 服务端部署的代理服务器,代理后端真实服务器接收客户端请求。客户端不知道后端服务器的存在,认为反向代理就是实际服务提供者。反向代理典型场景:负载均衡(将请求分发到多个后端服务器);隐藏真实服务器 IP(提升安全性);统一 SSL 加密/缓存/压缩(减轻后端压力)。
二、nginx安装
nginx安装可以使用yum安装和源码包安装,在工作中使用源码包安装会多一点
(一) yum安装
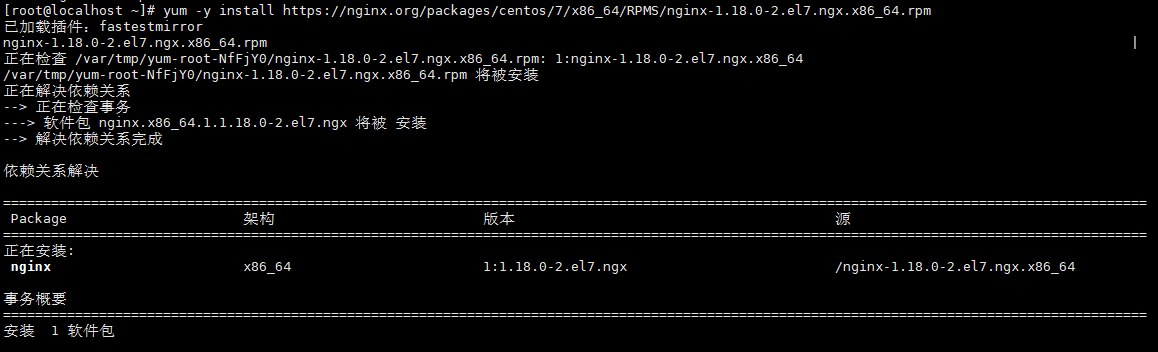
1.yum安装nginx
#这里我们可以直接使用yum加链接的方式进行安装,也可以使用wget下载后安装
[root@localhost ~]# yum -y install https://nginx.org/packages/centos/7/x86_64/RPMS/nginx-1.18.0-2.el7.ngx.x86_64.rpm
查看是否安装成功
[root@localhost ~]# rpm -qa|grep nginx

2.查看安装后产生的文件
[root@localhost ~]# rpm -ql nginx-1.18.0-2.el7.ngx.x86_64
/etc/logrotate.d/nginx #日志轮转
重点/etc/nginx/nginx.conf		#nginx主配置文件
重点/etc/nginx/conf.d		#nginx子配置文件夹
重点/etc/nginx/conf.d/default.conf		#子配置文件,默认网站配置文件
/etc/nginx/fastcgi_params		#动态网站模块文件,PHP所需
/etc/nginx/scgi_params		#python所需
/etc/nginx/uwsgi_params		#python所需
/etc/nginx/koi-utf		#字符集,文件编码
/etc/nginx/koi-win		#字符集
/etc/nginx/win-utf		#字符集
/etc/nginx/mime.types	#文件类型关联程序
/etc/nginx/modules		#模块,第三方模块
/etc/sysconfig/nginx		#系统配置文件,启动相关
/etc/sysconfig/nginx-debug		#调试
/usr/lib/systemd/system/nginx-debug.service		#nginx调试启用脚本
/usr/lib/systemd/system/nginx.service		#服务脚本
重点/usr/sbin/nginx		#主程序
/usr/sbin/nginx-debug		#调试文件
#文档文件
/usr/share/doc/nginx-1.18.0
/usr/share/doc/nginx-1.18.0/COPYRIGHT
/usr/share/man/man8/nginx.8.gz
/usr/share/nginx
重点/usr/share/nginx/html #网页文件存放位置
/usr/share/nginx/html/50x.html
/usr/share/nginx/html/index.html
/var/cache/nginx		#缓存
重点/var/log/nginx		#日志文件夹
/usr/lib64/nginx	#库模块,内核开发需要看

3.启停nginx
#启动
[root@localhost ~]# systemctl start nginx
#设置开机自启
[root@localhost ~]# systemctl enable nginx
#停止
[root@localhost ~]# systemctl stop nginx
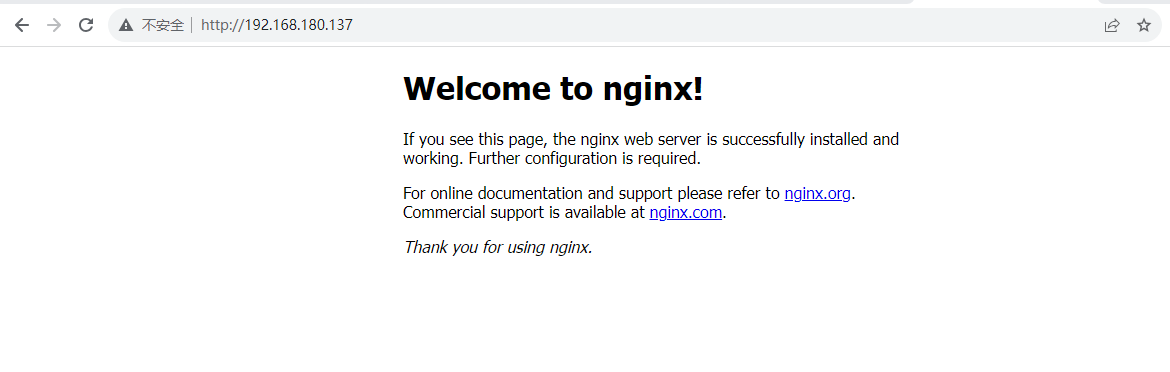
4.访问nginx
启动后可以打开浏览器,输入http://ip:port即可访问nginx主页面,**注意:**http端口默认是80,所以访问是可以不输入端口号
5.卸载nginx
[root@localhost ~]# yum -y remove nginx-1.18.0-2.el7.ngx.x86_64
(二) 源码包安装
1.创建一个文件夹,存放安装的nginx文件
mkdir /usr/local/nginx
2.安装nginx依赖包
yum -y install gcc gcc-c++ pcre pcre-devel zlib zlib-devel openssl openssl-devel
3.下载并解压nginx源码包
#创建文件夹存放安装包
mkdir /opt/soft/nginx -p && cd /opt/soft/nginx
#使用下面命令下载
wget https://nginx.org/download/nginx-1.18.0.tar.gz
#解压源码包
tar -zxvf nginx-1.18.0.tar.gz
#切换到解压后的包中
cd nginx-1.18.0
4.配置编译并安装
./configure --user=root --group=root --prefix=/usr/local/nginx \
--with-http_ssl_module  \
--with-http_v2_module \
--with-http_stub_status_module \
--with-http_gzip_static_module \
--with-http_sub_module --with-stream  \
--with-stream_ssl_module \
--with-openssl-opt=enable-weak-ssl-ciphers
#执行编译
make
#安装
make install
根据以上编译安装,安装后的所有文件会存放在/usr/local/nginx

更多编译参数
#安装时配置的参数
--prefix=/etc/nginx 	#编译安装安装路径
--sbin-path=/usr/sbin/nginx 	#指定执行程序路径
--modules-path=/usr/lib64/nginx/modules 	#模块文件路径
--conf-path=/etc/nginx/nginx.conf 	#主配置文件路径
--error-log-path=/var/log/nginx/error.log 	#错误日志路径
--http-log-path=/var/log/nginx/access.log 	#访问日志路径
--pid-path=/var/run/nginx.pid 	#进程id路径
--lock-path=/var/run/nginx.lock 	#启动锁文件,防止重复启动
--http-client-body-temp-path=/var/cache/nginx/client_temp 	#用户缓存路径
--http-proxy-temp-path=/var/cache/nginx/proxy_temp 	#代理缓存
--http-fastcgi-temp-path=/var/cache/nginx/fastcgi_temp 	#php缓存
--http-uwsgi-temp-path=/var/cache/nginx/uwsgi_temp 	#python缓存
--http-scgi-temp-path=/var/cache/nginx/scgi_temp 	#python缓存
--user=nginx 	#启用时的账号
--group=nginx 	#启用时的组
--with-compat 	#启用动态模块兼容性
#模块类
--with-file-aio #提高性能使用
--with-threads #多线程模块
--with-http_addition_module #响应追加
--with-http_auth_request_module #认证模块
--with-http_dav_module 	#支持网站上传下载
--with-http_flv_module 	#支持播放MP4
--with-http_gunzip_module 	#压缩模块
--with-http_gzip_static_module 	#压缩模块
--with-http_mp4_module 	#多媒体
--with-http_random_index_module 	#随机主页模块
--with-http_realip_module 	#真实ip模块
--with-http_secure_link_module 	#安全链接模块
--with-http_slice_module 	#中文文档
--with-http_ssl_module 	#网站加密,支持https
--with-http_stub_status_module 	#访问状态
--with-http_sub_module 	#替换网站响应式内容
--with-http_v2_module 	#web2.0技术
--with-mail 	#邮件模块
--with-mail_ssl_module 	#邮件模块
--with-stream 	#反向代理,负载均衡模块
--with-stream_realip_module 	#负载均衡模块
--with-stream_ssl_module 	#负载均衡模块
--with-stream_ssl_preread_module 	#负载均衡模块
#cpu优化参数
--with-cc-opt='-O2 -g -pipe -Wall -Wp,-D_FORTIFY_SOURCE=2 -fexceptions -fstack-protector-strong --param=ssp-buffer-size=4 -grecord-gcc-switches -m64 -mtune=generic -fPIC'
--with-ld-opt='-Wl,-z,relro -Wl,-z,now -pie'
5.启停nginx
#源码包安装后的nginx没有/usr/lib/systemd/system/nginx.service,所以启动方式和yum安装不同
#切换到启动文件目录
cd /usr/local/nginx/sbin
#启动
./nginx
#或者使用绝对路径进行启动
/usr/local/nginx/sbin/nginx
#重启nginx
/usr/local/nginx/sbin/nginx -s reload
#停止
/usr/local/nginx/sbin/nginx -s stop
6.设置system
#如果想要和yum安装启动方式一样,就需要创建以下文件
vim /lib/systemd/system/nginx.service
[Unit]
Description=nginx service
After=network.target

[Service]
Type=forking
ExecStart=/usr/local/nginx/sbin/nginx
ExecReload=/usr/local/nginx/sbin/nginx -s restart
ExecStop=/usr/local/nginx/sbin/nginx -s stop
PrivateTmp=true

[Install]
WantedBy=multi-user.target
7.启动并设置开机自启
systemctl enable nginx && systemctl start nginx
8.nginx进程模型
master	主进程
master用于管理worker
worker	工作进程
worker是为master进行服务的
三、Nginx基本配置
1.nginx配置文件组成
yum安装的配置文件路径:/etc/nginx
源码包安装的配置文件路径:/usr/local/nginx/conf
nginx的主配置文件:nginx.conf
1.核心模块,进程数等
#配置影响全局
user  nginx;	#指定操作系统的哪一个用户来执行
worker_processes  1;	#指定工作进程
error_log  /var/log/nginx/error.log warn;	#错误日志存储的位置
pid        /var/run/nginx.pid;	#进程id存储的位置
2.事件驱动,工作模块等
#主要影响nginx服务或与用户的网络连接
events {
    worker_connections  1024;	#设置最大连接数
}
3.http内核模块,文档程序类型等,配置文件等
#http块,可以嵌套多个server,配置代理,缓存,日志定义,第三方模块配置等
http {
    include       /etc/nginx/mime.types;	#文件类型关联程序配置
    default_type  application/octet-stream;	#应用程序流
    #日志格式
    log_format  main  '$remote_addr - $remote_user [$time_local] "$request" '
                      '$status $body_bytes_sent "$http_referer" '
                      '"$http_user_agent" "$http_x_forwarded_for"';
    access_log  /var/log/nginx/access.log  main;	#访问日志路径
    sendfile        on;	#加速nginx访问
    #tcp_nopush     on;	#优化nginx访问
    keepalive_timeout  65;	长连接
    #gzip  on;	#压缩
    include /etc/nginx/conf.d/*.conf;	#引入子配置文件夹路径
}
2.nginx子配置文件配置结构
路径:/etc/nginx/conf.d/default.conf
server {
    listen       80;	#监听端口
    server_name  localhost;	#服务访问地址/域名/ip
    #charset koi8-r;	#字符集,utf8
    #access_log  /var/log/nginx/host.access.log  main;	#网站日志放在哪里
    location / {	#服务器主页,网站文件路径以及支持格式
        root   /usr/share/nginx/html;
        index  index.html index.htm;
    }
    #访问时路径不对跳转的页面
    #error_page  404              /404.html;
    # redirect server error pages to the static page /50x.html
    #错误页面
    error_page   500 502 503 504  /50x.html;
    location = /50x.html {
        root   /usr/share/nginx/html;
    }
    #网站做代理时需要开启的及动态网站需要
    # proxy the PHP scripts to Apache listening on 127.0.0.1:80
    #
    #location ~ \.php$ {
    #    proxy_pass   http://127.0.0.1;
    #}
# pass the PHP scripts to FastCGI server listening on 127.0.0.1:9000
    #
    location ~ \.php$ {
        root           /usr/share/nginx/html;
        fastcgi_pass   127.0.0.1:9000;
        fastcgi_index  index.php;
        fastcgi_param  SCRIPT_FILENAME  $document_root$fastcgi_script_name;
        include        fastcgi_params;
    }
    # deny access to .htaccess files, if Apache's document root
    # concurs with nginx's one
    #
    #location ~ /\.ht {
    #    deny  all;
    #}
}
3.合整默认配置文件内容
#指定操作系统的哪一个用户来执行
#user  nobody;
#指定工作进程
worker_processes  1;
#错误日志
#debug info notice warn error crit
#error_log  logs/error.log;
#error_log  logs/error.log  notice;
#error_log  logs/error.log  info;
#进程id
#pid        logs/nginx.pid;

#设置最大连接数
events {
    worker_connections  1024;
}


http {
    include       mime.types;
    #默认type类型
    default_type  application/octet-stream;
	#用户请求日志 日志格式配置
    #log_format  main  '$remote_addr - $remote_user [$time_local] "$request" '
    #                  '$status $body_bytes_sent "$http_referer" '
    #                  '"$http_user_agent" "$http_x_forwarded_for"';

    #access_log  logs/access.log  main;
	#用于传输文件
    sendfile        on;
    #当数据包累计多少大小后发送
    #tcp_nopush     on;
	#客户端连接服务端超时时间,连接可以保持多长时间
    #keepalive_timeout  0;
    keepalive_timeout  65;
	#传输内容是否压缩
    #gzip  on;

    server {
    	#端口号
        listen       80;
        #服务访问地址/方式
        server_name  localhost;

        #charset koi8-r;

        #access_log  logs/host.access.log  main;
		#路由,需要取找的页面 斜杠代表根
        location / {
            root   html;
            index  index.html index.htm;
        }

        #error_page  404              /404.html;

        # redirect server error pages to the static page /50x.html
        #页面发生错误时调出页面
        error_page   500 502 503 504  /50x.html;
        location = /50x.html {
            root   html;
        }

        # proxy the PHP scripts to Apache listening on 127.0.0.1:80
        #
        #location ~ \.php$ {
        #    proxy_pass   http://127.0.0.1;
        #}

        # pass the PHP scripts to FastCGI server listening on 127.0.0.1:9000
        #
        #location ~ \.php$ {
        #    root           html;
        #    fastcgi_pass   127.0.0.1:9000;
        #    fastcgi_index  index.php;
        #    fastcgi_param  SCRIPT_FILENAME  /scripts$fastcgi_script_name;
        #    include        fastcgi_params;
        #}

        # deny access to .htaccess files, if Apache's document root
        # concurs with nginx's one
        #
        #location ~ /\.ht {
        #    deny  all;
        #}
    }


    # another virtual host using mix of IP-, name-, and port-based configuration
    #
    #server {
    #    listen       8000;
    #    listen       somename:8080;
    #    server_name  somename  alias  another.alias;

    #    location / {
    #        root   html;
    #        index  index.html index.htm;
    #    }
    #}


    # HTTPS server
    #
    #server {
    #    listen       443 ssl;
    #    server_name  localhost;

    #    ssl_certificate      cert.pem;
    #    ssl_certificate_key  cert.key;

    #    ssl_session_cache    shared:SSL:1m;
    #    ssl_session_timeout  5m;

    #    ssl_ciphers  HIGH:!aNULL:!MD5;
    #    ssl_prefer_server_ciphers  on;

    #    location / {
    #        root   html;
    #        index  index.html index.htm;
    #    }
    #}

}
4.静态资源服务举例
 server {
    	#监听端口
        listen       80;
        #服务访问地址
        server_name  localhost;
		#路由,需要取找的页面 斜杠代表根
        location / {
            root   html;
            index  index.html index.htm;
        }
        #root 指令的路径拼接规则
        location /www {
            root   /home;   # 实际路径:/home + /www = /home/www
        }
        #alias 指令的路径替换规则
        location /www {
            alias   /home/www; # 实际路径:/home/(直接替换 /www)
        }
}
5.域名解析
 server {
    	#监听端口
        listen 80;
        #服务访问地址
        server_name  www.web.com;
		#路由,需要取找的页面 斜杠代表根
        location / {
            root   html;
            index  index.html index.htm;
        }
}
#多域名
server {
    	#监听端口
        listen 80;
        #服务访问地址
        server_name  www.web.com www.nginxweb.com;
		#路由,需要取找的页面 斜杠代表根
        location / {
            root   html;
            index  index.html index.htm;
        }
}
6.多站点
 server {
    	#监听端口
        listen 80;
        #服务访问地址
        server_name  www.web.com;
		#路由,需要取找的页面 斜杠代表根
        location / {
            root   html;
            index  index.html index.htm;
        }
}
 server {
    	#监听端口
        listen 80;
        #服务访问地址
        server_name  www.web2.com;
		#路由,需要取找的页面 斜杠代表根
        location / {
            root   /www;
            index  index.html index.htm;
        }
}
7.连接状态
可以统计出网页被多少用户连接
#打开该模块stub_status_module,查看是否存在该模块nginx -V 2>&1|grep stub_status_module
server {
    listen       80 ssl;
    server_name  localhost;
    location / {
        root   html;
        index  index.html index.htm;
    }
    location /nginx_status{
    stub_status;
    allow all;
    }
}
#访问方式
ip:端口/nginx_ststus
四、Nginx日志管理
1.nginx日志概念
nginx日志是由nginx日志模块进行配置的,日志文件模块:ngx_http_log_module
nginx默认有两种日志:
- access_log #访问日志,统计用户访问信息
- error_log #错误信息日志
- yum安装的日志路径:/var/log/nginx
- 源码包安装日志路径:/usr/local/nginx/logs
2.日志格式
#默认格式
    log_format  main  '$remote_addr - $remote_user [$time_local] "$request" '
                      '$status $body_bytes_sent "$http_referer" '
                      '"$http_user_agent" "$http_x_forwarded_for"';
#参数说明
$remote_addr 远程地址,记录访问者IP地址;$remote_user 访问用户;[$time_local] 服务器本地时间; $request 记录请求协议; $status 请求状态;$body_bytes_sent 访问字节数;$http_referer 从哪里链接过来的;$http_user_agent 记录客户端浏览器信息;$http_x_forwarded_for 代理ip;
#日志的格式可以自定义,以下是我的自定义格式并且转换成json格式
log_format json '{'
                      '"remote_addr": "$remote_addr", '
                      '"remote_user": "$remote_user", '
                      '"time_local": "$time_local", '
                      '"request": "$request", '
                      '"status": "$status", '
                      '"body_bytes_sent": "$body_bytes_sent", '
                      '"http_referer": "$http_referer", '
                      '"http_user_agent": "$http_user_agent", '
                      '"http_x_forwarded_for": "$http_x_forwarded_for"'
                    '}';
2.日志轮转
轮转的作用是把一个大的日志割接成多个小的日志,否者日志太大不利于观察等。一般一天切割一次,错误日志一般不需要切割
1.割接脚本
# vim /usr/local/nginx/sbin/nginx_logrotate.sh
#!/bin/bash
log_path="/usr/local/nginx/logs/"
recode_time=$(date -d "yesterday" +%Y-%m-%d+%H:%M)
pid=/usr/local/nginx/logs/nginx.pid
mv ${log_path}/access.log ${log_path}/access.${recode_time}.log
mv ${log_path}/error.log ${log_path}/error.${recode_time}.log
kill -USR1 `cat $pid`
2.添加定时切割
crontab -e
*/1 * * * * /usr/local/nginx/sbin/nginx_logrotate.sh
五、反向代理
1.反向代理的配置
server {
        listen	80;
        server_name  www.web.com;
        location / {
            proxy_pass	http://www.baidu.com; #把访问地址转到后端地址
        }
}
proxy模块
#ngx_http_proxy_module
#代理的后端服务器URL
proxy_pass URL;
#转发时是否使用默认端口
proxy_redirect default;

#头信息
#转发时是否设置http头部信息,设置真实客户端地址
proxy_set_header Host $proxy_host;
#转发时添加头部真实的主机ip
proxy_set_header X-Real-IP $remote_addr;

#缓存配置
proxy_cache_path /tmp/nginx/cache levels=1:2 keys_zone=proxy_cache:10m max_size=10g inactive=60m use_temp_path=off;#配置缓存策略,缓存的路径,大小,时间等
#调用缓存策略,第二个等于keys_zone值
proxy_cache proxy_cache;
#配置哪些请求被缓存及时间
proxy_cache_valid 200 304 12h;
#配置其他请求被缓存及时间
proxy_cache_valid any 10m;
#定义缓存key
proxy_cache_key $host$uri$is_args$args;
#将缓存状态体现到http中
add_header Nginx-Cache "$upstream_cache_status";
#当后端服务器出现以下报错码时寻找下一个后端服务
proxy_next_upstream error timeout invalid_header http_500 http_502 http_503 http_504;


#计时器,观察代理器面对的客户是否断开,面对的真实服务器是否断开
proxy_connect_timeout 60s;
proxy_send_timeout 60s;
proxy_read_timeout 60s;
#代理缓冲去的大小和数量,用于存储http头部信息
proxy_buffering on;
proxy_buffer_size 32k;
proxy_buffers 4 128k;
proxy_busy_buffers_size 256k;
proxy_max_temp_file_size 256k;
2.负载均衡
Nginx 作为一款高性能的反向代理服务器和负载均衡器,被广泛用于分发客户端请求到多个后端服务器,以提高系统的可用性、扩展性和容错能力。
负载均衡的作用:
- 流量分发:将客户端请求均匀分发到多个服务器,避免单点过载。
- 高可用性:自动检测后端服务器状态,故障时自动剔除不可用节点。
- 横向扩展:通过添加服务器提升系统整体处理能力。
- 会话保持:支持会话粘滞(如基于 Cookie 或 IP),确保用户请求路由到同一服务器。
负载均衡分类:
- 四层负载均衡:
层级:基于 OSI 模型的传输层(Layer 4),主要处理 TCP/UDP 流量。 特点:仅根据 IP 地址和端口号进行流量分发,不解析应用层协议内容。 适用场景:数据库、SSH、游戏服务器、实时通信等 TCP/UDP 协议场景。
# nginx.conf
stream {
    upstream backend_tcp {
        server 192.168.1.10:3306;  # MySQL 服务器
        server 192.168.1.11:3306;
    }

    server {
        listen 3306;  # 监听 TCP 3306 端口(MySQL 默认端口)
        proxy_pass backend_tcp;
    }
}
- 七层负载均衡:
层级:基于 OSI 模型的应用层(Layer 7),支持解析 HTTP/HTTPS、SMTP 等协议。 特点:根据应用层内容(如 URL、Cookie、Header、请求体)进行流量分发。 适用场景:Web 服务器、API 网关、微服务路由、基于内容的缓存和过滤。
http {
    upstream backend_http {
        server 192.168.1.10:80;
        server 192.168.1.11:80;
    }

    server {
        listen 80;
        location / {
            proxy_pass http://backend_http;
            proxy_set_header Host $host;
            # 根据 URL 路径分发请求
            if ($request_uri ~* "/api/") {
                proxy_pass http://api_servers;
            }
        }
    }
}
2.1 轮训
默认策略:请求按顺序依次分发到后端服务器。
#配置上游服务器
upstream heber{
	server	192.168.0.118:8080;
	server	192.168.0.119:8080;
}
server {
        listen	80;
        server_name  www.web.com;
        location / {
            proxy_pass	http://heber;
        }
}
2.2 加权轮询
按权重分配:为性能不同的服务器分配不同权重(权重越高,处理更多请求)。
#配置上游服务器
upstream heber{
	server	192.168.0.118:8080 weight=3;  #如果不想让他负载可以添加down
	server	192.168.0.119:8080 weight=2;
	server	192.168.0.120:8080 weight=1; #添加备用负载添加backup,当前面的都不能使用时才会启动
}
server {
        listen	80;
        server_name  www.web.com;
        location / {
            proxy_pass	http://heber;
        }
}
2.3 最少连接
动态分配:将请求分发给当前连接数最少的服务器。
#配置上游服务器
upstream heber{
    least_conn;
	server	192.168.0.118:8080;
	server	192.168.0.119:8080;
}
server {
        listen	80;
        server_name  www.web.com;
        location / {
            proxy_pass	http://heber;
        }
}
2.4 upstream参数指令
max_conns	最大连接数							slow_start	让集群缓慢启动
down	不参与负载								backup	表示备用机
max_fails	最大失败次数							fail_timeout	失败时间段
3.维持会话
当我们使用upstream去做负载均衡后,我们在登录的时候就会登录不上,这个时候我们的负载就需要添加ip_hash算法进行分配即可
#配置上游服务器
upstream heber{
    ip_hash;
	server	192.168.0.118:8080;
	server	192.168.0.119:8080;
}
server {
        listen	80;
        server_name  www.web.com;
        location / {
            proxy_pass	http://heber;
        }
}
4.缓冲区
Nginx 的 缓冲区(Buffering) 是一种临时存储数据的机制,用于在处理客户端请求或代理响应时平衡内存使用与性能。合理配置缓冲区可以优化吞吐量、防止资源耗尽,但不当配置可能导致内存溢出或延迟问题。缓冲区的配置可以配置在http,server,location中。
4.1 缓冲区的作用
临时存储数据 当客户端上传大文件(如上传视频)时,Nginx 先将数据缓存在内存或磁盘,再分块传递给后端。 当反向代理时,Nginx 先完整接收后端响应逐步返回给客户端。 提升性能 减少频繁的 I/O 操作,尤其在高并发场景下能降低系统负载。 保护后端服务 避免慢客户端(如低速网络用户)长时间占用后端连接。
4.2 客户端请求缓冲区(处理客户端→Nginx的数据)
http {
    # 客户端请求体的内存缓冲区大小(默认8k或16k,根据平台)
    client_body_buffer_size 16k;

    # 客户端请求体超出内存缓冲区时,写入临时文件的阈值
    client_body_in_file_only off;  # off表示允许内存+磁盘,on表示强制写入文件
    client_max_body_size 100M;     # 允许最大文件上传(超出返回413错误)
}
4.3 代理缓冲区(处理Nginx→上游服务器的数据)
http {
    proxy_buffering on;  # 是否启用代理缓冲(默认on)

    # 代理响应头的缓冲区大小(通常足够存储响应头)
    proxy_buffer_size 4k;

    # 代理响应体的缓冲区数量和大小(默认8个缓冲区,每个4k或8k)
    proxy_buffers 8 16k;  # 8个缓冲区,每个16k

    # 当响应超出proxy_buffers时,允许写入临时文件
    proxy_max_temp_file_size 1024m;  # 临时文件最大大小
    proxy_temp_file_write_size 64k;   # 每次写入临时文件的数据块大小

    # 处于“繁忙”状态(正在发送到客户端)的缓冲区大小上限
    proxy_busy_buffers_size 32k;
}
4.4 示例配置
http {
    client_max_body_size 2G;        # 允许最大2GB文件上传
    client_body_buffer_size 256k;   # 请求体内存缓冲区256k

    proxy_buffering on;
    proxy_buffer_size 16k;          # 响应头缓冲区
    proxy_buffers 16 1M;            # 16个缓冲区,每个1MB
    proxy_max_temp_file_size 4G;    # 允许临时文件最大4GB
    proxy_temp_file_write_size 128k;

    upstream backend {
        server 10.0.0.1:8080;
    }

    server {
        location /upload {
            proxy_pass http://backend;
            proxy_http_version 1.1;
            proxy_set_header Connection "";
        }
    }
}
5.代理头信息
在 Nginx 中,代理头信息(Proxy Headers)是指通过反向代理将客户端请求转发到后端服务器时,修改或添加的 HTTP 请求头信息。这些头信息对后端服务器正确处理请求、识别客户端真实信息以及保障安全至关重要。
4.1 基础头信息
#配置上游服务器
upstream heber{
    ip_hash;
	server	192.168.0.118:8080;
	server	192.168.0.119:8080;
}
server {
        listen	80;
        server_name  www.web.com;
        location / {
            proxy_pass	http://heber;
            # 核心头信息配置
            proxy_set_header Host $host;          # 传递客户端请求的原始主机名
            proxy_set_header X-Forwarded-For  $remote_addr;   # 客户端真实 IP
            proxy_set_header X-Forwarded-Proto $scheme; # 客户端请求协议(http/https)
            # 超时设置
            proxy_connect_timeout 60s;
            proxy_read_timeout    600s;
        }
}
4.2 高级场景与配置
处理 WebSocket 代理 WebSocket 需要额外头信息维持长连接:
location /ws/ {
    proxy_pass http://websocket_backend;
    proxy_http_version 1.1;
    proxy_set_header Upgrade    $http_upgrade;  # 升级协议为 WebSocket
    proxy_set_header Connection "upgrade";
}
4.3 自定义头信息
向后端传递自定义头(如认证 Token):
proxy_set_header Authorization "Bearer $http_authorization"; # 传递客户端 Token
4.4 防止头信息被覆盖
确保代理不覆盖后端设置的头:
proxy_pass_request_headers on; # 默认开启,允许传递所有客户端头到后端
六、动静分离
Nginx 的 动静分离 是一种优化 Web 应用性能的常见策略,核心思想是将静态资源(如图片、CSS、JS 文件)和动态内容(如 API 接口、动态生成页面)分别由不同的服务器或处理逻辑处理,从而提高整体系统的响应速度和资源利用率。
1.动静分离的作用
(1) 提升性能 静态资源:直接由 Nginx 本地处理(或通过 CDN 分发),无需经过后端应用服务器,减少延迟。 动态请求:仅转发到后端应用服务器(如 Tomcat、Node.js),避免静态资源占用后端处理能力。 (2) 降低服务器压力 静态资源通常占网站流量的 70% 以上,分离后显著减少后端服务器的负载。 Nginx 擅长高并发静态文件处理,避免应用服务器因频繁 I/O 操作成为瓶颈。 (3) 优化缓存策略 可对静态资源设置长期缓存(如 Cache-Control: max-age=31536000),减少重复请求。 动态内容可单独配置缓存策略(如短时间缓存或无缓存)。 (4) 提升扩展性 静态资源可独立部署到 CDN 或对象存储(如 AWS S3、阿里云 OSS),动态服务单独横向扩展。
2.动静分离的配置实现
server {
    listen 80;
    server_name www.web.com;
    # 静态资源路径(图片、CSS、JS)
    location ~* \.(jpg|jpeg|gif|png|css|js|ico|webp|svg|images)$ {
        root html;
        expires 365d;          # 设置长期缓存
        access_log off;         # 可选:关闭日志减少磁盘压力
    }
    # 动态请求转发到后端应用服务器
    location / {
        proxy_pass http://backend_server;  # 后端应用服务器地址(如 Tomcat、Node.js)
        proxy_set_header Host $host;
        proxy_set_header X-Real-IP $remote_addr;
    }
}
七、http和https
HTTP(HyperText Transfer Protocol)和 HTTPS(HTTP Secure)是用于客户端与服务器之间传输数据的核心协议,广泛应用于 Web 通信。
HTTP:
- 无状态:每次请求独立,不保留会话信息(需 Cookie/Session 扩展)。
- 明文传输:数据未经加密,易被窃听、篡改(如中间人攻击)攻击者可注入广告或恶意代码。
- 默认端口:80。
HTTPS:
- 在 HTTP 基础上通过 SSL/TLS 加密实现安全通信。
- 加密传输:数据加密后传输,防止窃听和篡改。
- 身份认证:通过数字证书验证服务器身份。
- 完整性校验:确保数据在传输中未被修改。
1.https配置
#安装需要秘钥生成软件
yum -y install openssl openssl-devel
#生成一对密钥
openssl genrsa -out cert.key 2048
genrsa RSA类型
-out cert.key 密钥存放在哪个文件
2048 密钥的长度 越长越安全
#生成证书的申请文件
openssl req -new -key cert.key -out cert.csr -days 365
-new 申请新的证书
-key cert.key 密钥的路径
-out cert.csr 申请证书的路径
-days 365 证书的有效期
#颁发证书
openssl x509 -req -in cert.csr -signkey cert.key -out cert.pem -days 365
x509 颁发证书的
-in cert.csr 申请证书
-signkey cert.key 密钥
-out cert.pem 证书的名字
-days 365 有效时间
#将生成的证书复制到conf目录
cp ~/cert.key /nginx/conf
cp ~/cert.pem /nginx/conf
#在nginx中填写
    server {
        listen       443 ssl;
        server_name  localhost;

        ssl_certificate      cert.pem;
        ssl_certificate_key  cert.key;

        ssl_session_cache    shared:SSL:1m;
        ssl_session_timeout  5m;

    #    ssl_ciphers  HIGH:!aNULL:!MD5;
    #    ssl_prefer_server_ciphers  on;

        location / {
            root   html;
            index  index.html index.htm;
        }
    }
2.http重定向https
server {
listen 80;
server_name xxx.com;
rewrite ^(.*) https://$server_name$request_uri? permanent ;
}
八、nginx模块
1.模块介绍
Nginx 采用模块化架构,通过不同的模块实现灵活的功能扩展。总体模块可以分为核心模块、常用官方模块及第三方模块。在安装nginx会默认安装一些模块,如果需要其他模块可以手动编译添加
第三方模块下载地址:https://bitbucket.org/nginx-goodies/nginx-sticky-module-ng/
查看模块方法
/usr/local/nginx/sbin/nginx -V
或者
/usr/local/nginx/sbin/nginx -V 2>&1 | grep 'configure arguments:'

2.模块添加
#切换到源码包文件
cd /opt/soft/nginx/nginx-1.18.0
#重新编译
./configure \
--user=root --group=root --prefix=/usr/local/nginx \
--with-http_ssl_module \
--with-http_v2_module \
--with-http_stub_status_module \
--with-http_gzip_static_module \
--with-http_sub_module \
--with-stream \
--with-stream_ssl_module \
--with-openssl-opt=enable-weak-ssl-ciphers \
--add-module=/path/to/third-party-module \  # 如果是第三方模块
--with-http_geoip_module                    # 新增的模块
#编译并替换二进制文件
make  # 仅编译,不要运行 make install(避免覆盖配置)
#停掉nginx
/usr/local/nginx/sbin/nginx -s stop
#替换主程序
cp /usr/local/nginx/sbin/nginx /usr/local/nginx/sbin/nginx.bak  # 备份
cp objs/nginx /usr/local/nginx/sbin/nginx                        # 替换
#启动
/usr/local/nginx/sbin/nginx
#验证
/usr/local/nginx/sbin/nginx -V 2>&1 | grep 'configure arguments:'

3.随机主页
随机微更新网页,所需模块:random_index_module
#启动将主页设置成随机页,达到微更新
location / {
root /app
random_index on;
}
4.替换模块
快速替换文件内容,所需模块:sub_module
#启动替换内容
sub_filter nginx "he_ber";
sub_filter_once on;
5.文件读取
#默认打开
ngx_http_core_module
6.文件压缩
所需模块:--with-http_gzip_static_module
1.gzip配置
#开启gzip压缩功能,提高传输效率,减少带宽开销
gzip on;
#限制最小压缩,小于1个字节就不压缩
gzip_min_length 1;
#定义压缩级别
gzip_comp_level 3;
#定义压缩文件类型
gzip_types text/plain text/css;
示例
server {
        listen 80;
        server_name localhost;
        client_max_body_size 500M; #上传文件限制
        #gzip压缩
        gzip on;
        gzip_http_version 1.0;
        gzip_disable 'MSIE [1-6]';
        gzip_types image/jpeg image/png image/jpg application/javascript text/css;
        location / {
            expires 3d;
            proxy_pass http://ip:port;
            proxy_set_header Host $host;
            proxy_set_header X-Real-IP $remote_addr;
            proxy_set_header X-Forwarded-For $proxy_add_x_forwarded_for;
            proxy_set_header X-Forwarded-Proto $scheme;
        }
    }
7.页面缓存
控制页面缓存作用,可以减少服务器的请求
#缓存过期时间
expires 24h;
2.上游服务器缓存
#配置上游服务器
upstream heber{
	server	192.168.0.118:8080;
	server	192.168.0.119:8080;
}
#设置缓存保存的目录
proxy_cache_path /nginx/upsteam_cache keys_zone=mycache:5m max_size=1g inactive=1h use_temp_path=off;
server {
        listen	80;
        server_name  www.he_ber.com;
        #开启并使用缓存
        proxy_cache	mycache;
        #设置针对缓存码的缓存时间
        proxy_cache_valid 200 304 8h;
        location / {
            proxy_pass	http://heber;
        }
}
8.防盗链
防盗链可以防止人家使用图片链接等
location ~*/(jpg|jpeg|gif|png|css|js|ico|webp|svg|images) {
    #对原站点验证
    valid_referers none *.heber.com;
    #非法引入会进入下方判断
    if ($invalid_referer){
        return 404;
    }
}
九、平滑升级
Nginx的平滑升级停止服务即可更新 Nginx 版本或重新加载配置的技术。通过保留旧进程处理已建立的连接,同时启动新进程接受新请求,实现 零停机时间的更新操作。
1.方式一
#切换目录
cd /opt/soft/nginx
#下载包
wget https://nginx.org/download/nginx-1.20.0.tar.gz
tar -zxvf nginx-1.20.0.tar.gz
cd nginx-1.20.0
#编译
./configure --user=root --group=root --prefix=/usr/local/nginx \
--with-http_ssl_module  \
--with-http_v2_module \
--with-http_stub_status_module \
--with-http_gzip_static_module \
--with-http_sub_module --with-stream  \
--with-stream_ssl_module \
--with-openssl-opt=enable-weak-ssl-ciphers
#编译并安装
make && make install
#以上操作完成之后,会把原来的旧版本备份为nginx.old
#查看进程
ps -ef|grep nginx
#新旧版本同时运行
kill -USR2 主进程号
#查看旧的主进程号,并使用kill -WINCH 优雅的关闭的子进程,再关闭旧的主进程
kill -WINCH 旧的主进程号
kill -QUIT 旧的主进程号
#最后查看nginx版本
[root@localhost /usr/local/nginx/sbin]# nginx -v
nginx version: nginx/1.20.0
2.方式二
#切换目录
cd /opt/soft/nginx
#下载包
wget https://nginx.org/download/nginx-1.20.1.tar.gz
tar -zxvf nginx-1.20.1.tar.gz
cd nginx-1.20.1
#编译
./configure --user=root --group=root --prefix=/usr/local/nginx \
--with-http_ssl_module  \
--with-http_v2_module \
--with-http_stub_status_module \
--with-http_gzip_static_module \
--with-http_sub_module --with-stream  \
--with-stream_ssl_module \
--with-openssl-opt=enable-weak-ssl-ciphers
#默认平滑升级的操作
make install && make upgrade
#最后查看nginx版本
[root@localhost /usr/local/nginx/sbin]# nginx -v
nginx version: nginx/1.20.1
十、访问配置
1.访问限制
限制不是完全不能访问,只是限制掉一些条件请求
ngx_http_limit_req_module限制http请求
#安装httpd-tools工具做抗压测试
yum -y install httpd-tools
#模拟测试发送100次请求,10次分发
ab -n 100 -c 10 http://ip:端口
#启动限制
limit_req_zone $binary_remote_addr zone=req_zone:10m rate=1r/s;
limit_req zone=req_zone;
ngx_http_limit_conn_module限制tcp链接
#启用
limit_conn_zone $binary_remote_addr zone=conn_zone:10m;
limit_conn conn_zone 1;
2.访问控制
控制直接封ip或者用户
#启动ngx_http_access_module
allow 192.168.0.*;#允许访问的
deny all;#封杀的
十一、nginx集群
集群有很多种,可以分为:负载均衡,高可用,高性能存储。
1.负载均衡集群LVS
负载均衡增加处理能力,有一定的高可用能力,但不是高可用集群,是以提高服务的并发处理能力为主。这里使用的是软件负载均衡设备lvs(四层路由设备)。实现负载均衡一般可以使用顺序,流量,比重服务等类型进行分配,lvs工作模式:nat转发模式,DR直接路由模式,隧道模式,full模式。
nat转发模式
优点:网络隔离更安全,节约ip地址
缺点:访问量大了很可能成为系统瓶颈
1.lvs安装
yum -y isntall ipvsadm
2.负载策略
#开启路由功能
echo 1 >/proc/sys/net/ipv4/ip_forward
ipvsadm -A -t 外网ip -s rr#对外服务器
ipvsadm -a -t 公网ip -r web1ip -m#对内真实webip
ipvsadm -a -t 公网ip -r web2ip -m
DR直接路由模式
针对同一网段或都是公网ip
1.准备vip和路由
#增加vip
ifconfig ens32:0 虚拟ip broadcast 虚拟ip网络到255 netmask 255.255.255.0
#配置路由
route add -host 虚拟ip dev ens32:0
#永久开启路由
vim /etc/sysctl.conf
net.ipv4.ip_forward=1
2.lvs安装
yum -y isntall ipvsadm
3.负载策略
#临时添加
ipvsadm -C #清除
ipvsadm -A -t 外网ip:端口 -s rr#对外服务器
ipvsadm -a -t 公网ip:端口 -r web1ip:端口 -g#对内真实webip
ipvsadm -a -t 公网ip:端口 -r web2ip:端口 -g
#参数说明
-A 添加vip
-t 指定使用tcp
-s 指定调度策略
-a 添加真实reallserver
-r 指定具体reallserver是谁
-g lvs类型DR
#永久
ipvsadm-save > /etc/sysconfig/ipvsadm
4.给web服务器lo网卡设置子网掩码为32位vip
ifconfig lo:0 ip/32
lo #假接口,防止冲突
轮巡
rr	#轮巡
wrr	#权重
lc	#最少连接
wlc	#加权最少连接
2.高可用keepalived
使用keepalived可以产生一个虚拟ip,用户访问时也是访问虚拟ip,就算集群的机器挂了一台访问虚拟ip一样可以访问,从而达到高可用集群。(vip就是keepalived的虚拟ip)
1.安装keepalived
#解压安装包
tar -zxvf keepalived-2.0.18.tar.gz
#创建一个文件夹存放安装的应用
mkdir /nginx/keepalived
#安装依赖包
yum -y install libnl libnl-devel
#配置keepalived安装路径
./configure --prefix=/nginx/keepalived --sysconf=/etc
#开始安装
make && make install
#查看keepalived在什么位置
whereis keepalived
2.配置keepalived
#打开配置文件
vim /etc/keepalived/keepalived.conf
#配置参数
! Configuration File for keepalived
#如果出现问题邮箱通知配置
global_defs {
   notification_email {
     acassen@firewall.loc
     failover@firewall.loc
     sysadmin@firewall.loc
   }
   notification_email_from Alexandre.Cassen@firewall.loc
   smtp_server 192.168.200.1
   smtp_connect_timeout 30
   #路由id:当前安装keepalived的主机节点标识符
   #router_id LVS_DEVEL
   router_id keep_118
   vrrp_skip_check_adv_addr
   vrrp_strict
   vrrp_garp_interval 0
   vrrp_gna_interval 0
}
#加入nginx检测脚本
vrrp_script check_nginx_alived {
	script	"/etc/keepalived/check_nginx_alivd_or_not.sh"
	interval 2
	weigth 10
}
#计算机节点
vrrp_instance VI_1 {
	#表示的状态,当前的118为nginx的主节点,MASTER/BACKUP
    state MASTER
    #当前实例绑定的网卡
    interface ens33
    #保证主备节点一致
    virtual_router_id 51
    #权重,优先级
    priority 100
    #主备之间同步检查的时间
    advert_int 1
    #认证授权的密码
    authentication {
        auth_type PASS
        auth_pass 1111
    }
    #调用脚本
    track_script {
    	check_nginx_alived
    }
    #虚拟ip
    virtual_ipaddress {
        192.168.0.120
    }
}
3.启动keepalived
cd /nginx/keepalived/sbin
./keepalived
4.设置开机自启
cd /opt/keepalived-2.0.18/keepalived/etc
cp init.d/keepalived /etc/init.d/
cp sysconfig/keepalived /etc/sysconfig/
systemctl daemon-reload
systemctl enable keepalived
5.备用节点配置
! Configuration File for keepalived
global_defs {
   #路由id:当前安装keepalived的主机节点标识符
   router_id keep_119
}
#计算机节点
vrrp_instance VI_1 {
        #表示的状态,当前的118为nginx的主节点,MASTER/BACKUP
    state BACKUP
    #当前实例绑定的网卡
    interface ens33
    #保证主备节点一致
    virtual_router_id 51
    #权重,优先级
    priority 80
    #主备之间同步检查的时间
    advert_int 1
    #认证授权的密码
    authentication {
        auth_type PASS
        auth_pass 1111
    }
    #虚拟ip
    virtual_ipaddress {
        192.168.0.120
    }
}
6.配置keepalived重启nginx
vim check_nginx_alivd_or_not.sh
#!/bin/bash
ng=`ps -C nginx --no-header |wc -l`
#判断是否宕机,如果宕机自动重启
if [ $ng -eq 0 ];then
	/nginx/sbin/nginx
	#等待一会继续检查
	sleep 3
	if [ `ps -C nginx --no-header |wc -l` -eq 0 ];then
	killall keepalived
	fi
fi
7.双主热备
#在之前的备用服务里面添加
vrrp_instance VI_2 {
    state MASTER
    interface ens3
    virtual_router_id 52
    priority 100
    advert_int 1
    authentication {
        auth_type PASS
        auth_pass 1111
    }
    virtual_ipaddress {
        192.168.0.121
    }
}
#在之前的主服务里面添加
vrrp_instance VI_2 {
    state BACKUP
    interface ens33
    virtual_router_id 52
    priority 80
    advert_int 1
    authentication {
        auth_type PASS
        auth_pass 1111
    }
    virtual_ipaddress {
        192.168.0.121
    }
}